Complete bathroom remodels for Houston homes, from demolition and waterproofing through tile, vanity and fixture set.
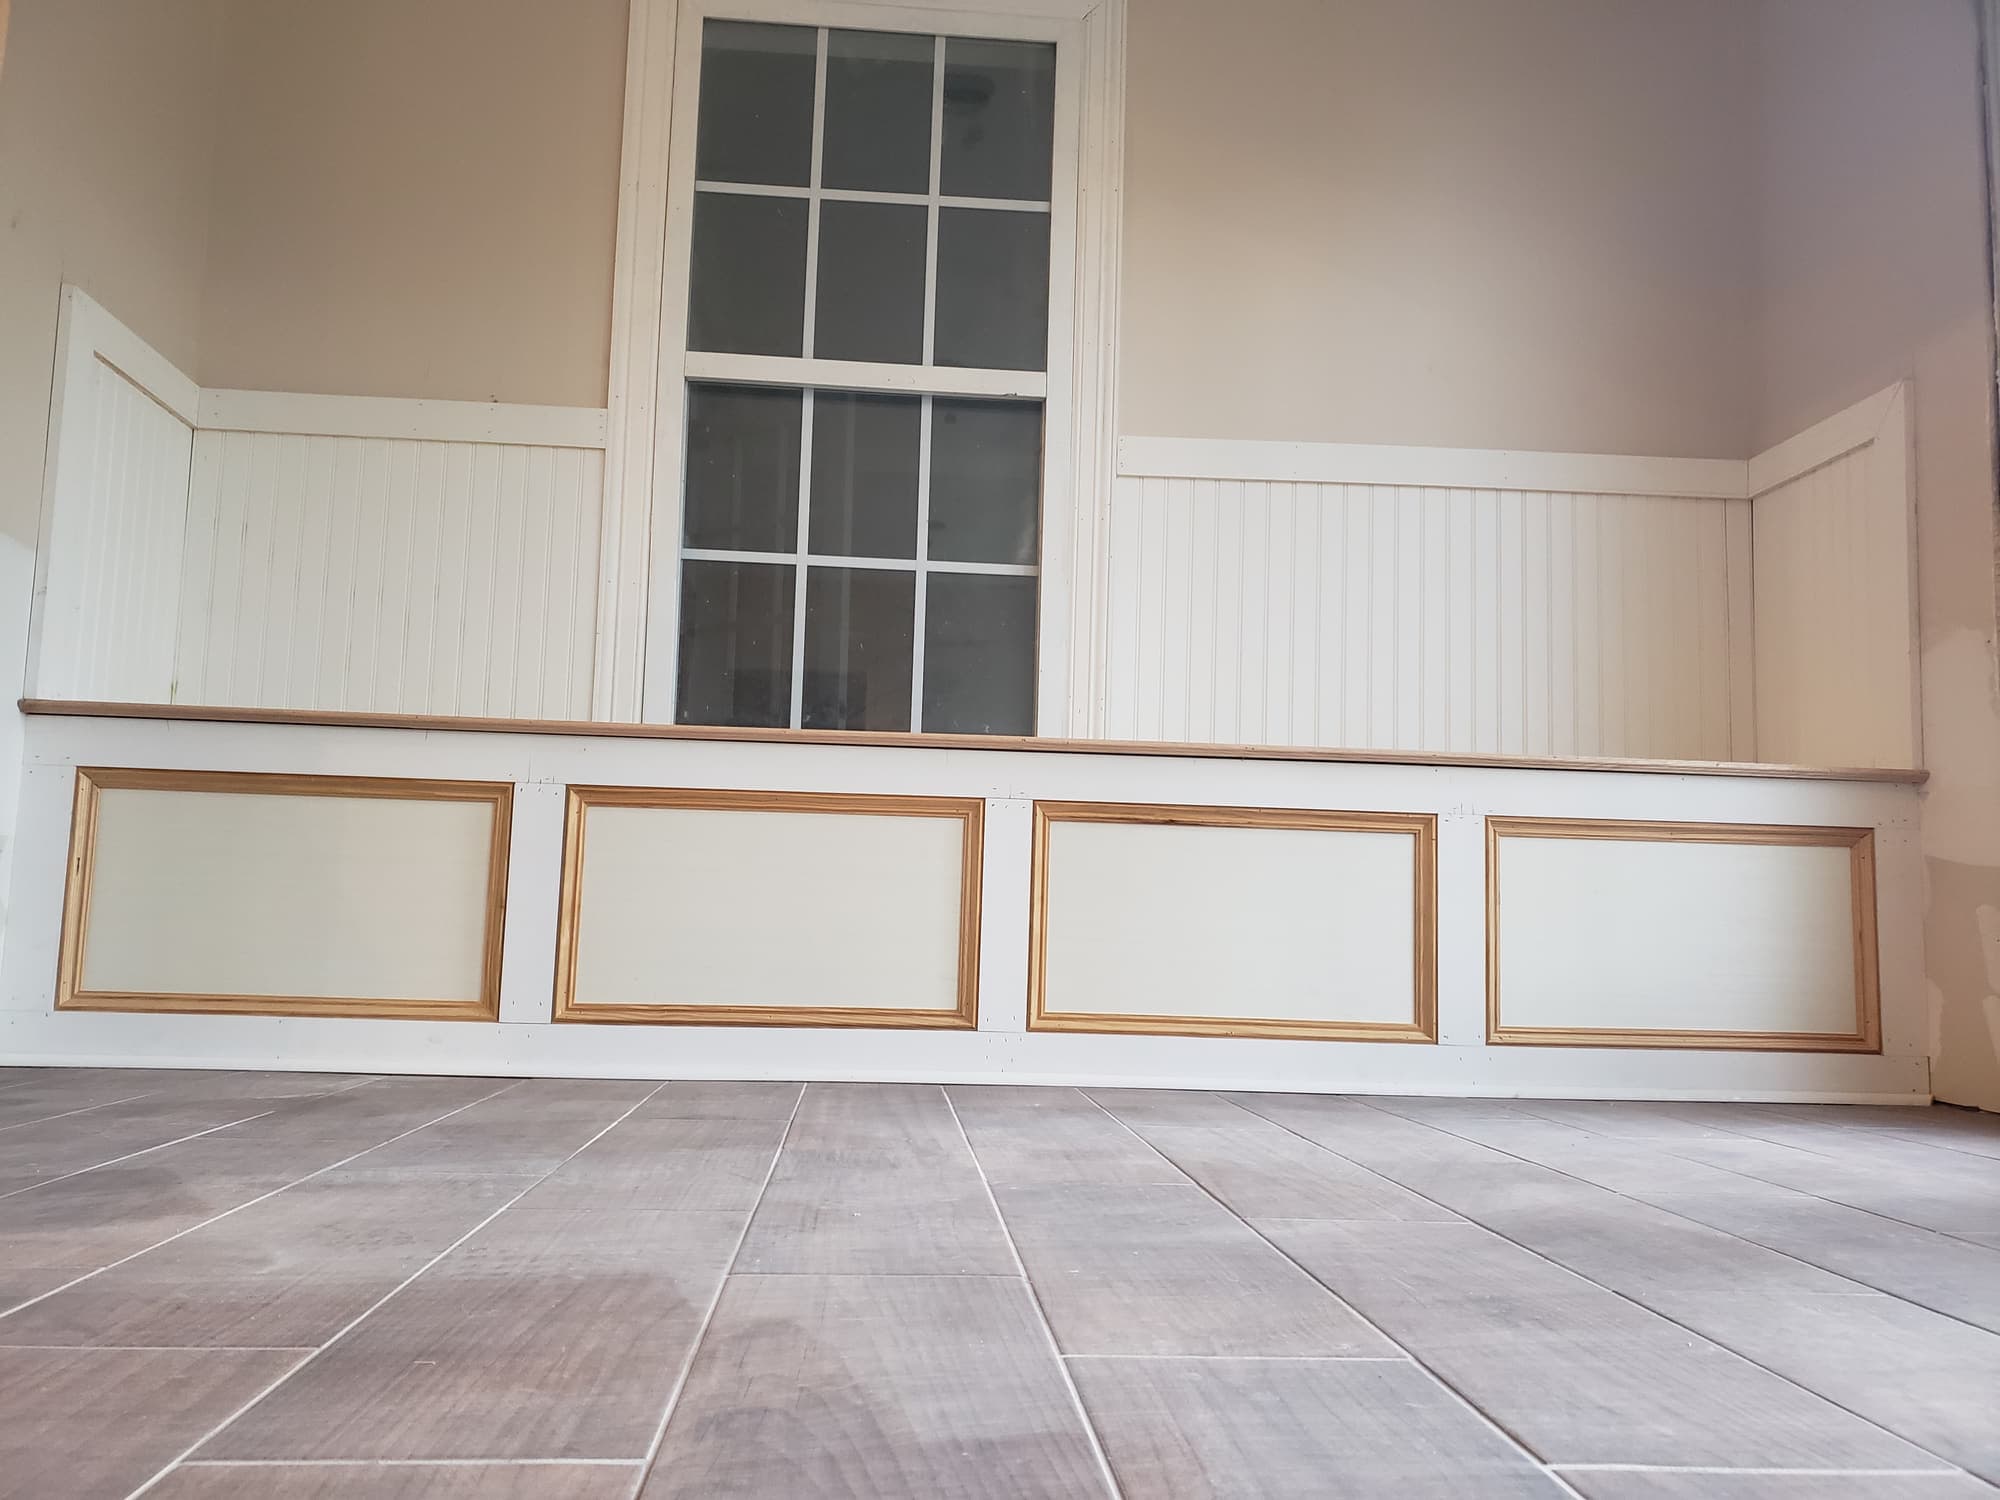
Beadboard wainscoting, chair rail and recessed panel base over wood-look tile.
In our own words
Bathroom Renovation Services
Ready to transform your bathroom into a beautiful, modern space? We offer complete bathroom remodeling services.
Everything below is the detail behind that: how the work is sequenced, what it is built from, and what changes in a Houston house.
A bathroom is judged by the parts nobody ever sees: the fall of the shower pan, the membrane bonded to the backer board, and whether the drain was set so water actually leaves the assembly. Tile covers all of it on day one. Two years later a dark grout line at the curb, a loose tile at the threshold, or a soft spot in the hall floor outside the door tells you which steps were skipped.
We remodel bathrooms end to end for Houston-area homeowners: demolition, framing changes and blocking, coordination of rough plumbing and electrical, waterproofing, tile, vanity and countertop, shower glass, drywall repair, trim and paint. Residential work only, more than 15 years of it, in Houston and the surrounding areas.
Beadboard wainscot with a chair rail, panelled base and wood-look porcelain tile from another project. The same detailing holds up well in powder rooms and hall baths, where the lower wall takes the splashes and the mop.
Not every bathroom needs to go to the studs. A hall bath with a sound tub, a flat floor and no history of leaks can be reworked with new tile, a new vanity, better light and paint. A primary bath with a weeping shower pan, a spongy subfloor at the closet flange, or a layout that has to change is a different job with a different budget, and it is far better to find that out while the estimate is being written than three days into demolition.
What the job includes
Scope, in the order it happens
01
Demolition and what it exposes
Tile, tub or shower base, vanity, flooring, and any swollen or crumbling board come out first. With the walls open we look at the sole plate at the exterior wall, the subfloor and joists around the toilet flange, the condition of the shower valve and supply lines, and any staining that points to a leak that has been running for a while. Repairs found at this stage are priced and shown to you before we cover anything back up. If a shower is actively leaking into a ceiling below, that is a call we take outside normal business hours.
02
Framing, blocking and layout changes
Widening a door to a 32 in. clear opening, framing a niche between studs, furring a wall flat for large-format tile, or picking up a bathroom's worth of space from an adjoining closet are all framing decisions made before board goes on. We set 2x8 blocking behind future grab bar locations, at the vanity, behind towel bars and for any wall-hung fixture, because a drywall anchor is not a substitute for wood. Enlarging a bathroom into an adjacent room is the same structural work described on our wall removal and open concept page, including a properly sized header if the wall is carrying load.
03
Rough plumbing and electrical coordination
Valve bodies get set to the correct rough-in depth for the finished wall thickness, which is what decides whether the trim plate sits flat later. Pressure-balancing or thermostatic valves, quarter-turn stops, correct drain and vent runs, GFCI protection at the receptacles, wet-rated trims over a tub or shower, and a dedicated circuit where one is needed. Permit-required plumbing and electrical is performed by the specialty trades who can pull those permits in your jurisdiction, and we schedule around their inspections.
04
Waterproofing the wet area
The wet area gets a continuous waterproofing system, not a patchwork: bonded sheet or liquid-applied membrane over the backer, preformed inside and outside corners, a drain matched to the waterproofing method, meaning a bonding-flange drain where the membrane bonds directly to it, or a clamping-ring drain over a mortar bed with its weep holes kept clear, and the membrane carried over the curb and returned down the outside face. Every penetration for the valve, the head and the mixer gets sealed. Then the pan is flood tested before a single tile is set.
05
Tile on floors, walls, niches and curbs
Layout is drawn before anything is cut so the full tiles land where the eye goes, cuts fall in the corners, and the niche courses line up with the wall joints instead of missing them by half an inch. Large-format tile gets back-buttered and beaten in, over a substrate that has been flattened first, since a flat wall is the only way big tile lays without lippage. Edges are finished with a metal profile such as a Schluter-type trim or a mitred tile edge, not a bullnose glued over a bad cut. The same standards apply to the rest of the house on our tile installation and flooring installation work.
06
Vanity, countertop, glass and fixtures
Vanities are scribed and shimmed level to the floor rather than jammed against a wall, tops set with the sink cutout supported, and faucets and drains assembled and tested before the cabinet doors go back on. Frameless shower glass is measured after the tile is finished, not before, which is why the glass usually arrives a week or two behind everything else. Mirrors, lights, towel bars and paper holders land on the blocking that went in during framing.
07
Drywall, trim and paint
Board outside the wet zone gets patched or replaced, joints taped and floated, and the texture matched to the rest of the house so the bathroom does not read as a repair. Beadboard wainscot, chair rail, panelled base and door casing are installed and caulked at the wall, and the wall gets a scrubbable, mildew-resistant finish. This is the same drywall, trim carpentry and interior painting work we do elsewhere in the home.
Materials and specification
What it is actually built from
Specifications vary with the house and what we find once it is open. This is the standard we work to unless there is a reason not to — and if there is, we will tell you what it is before we change it.
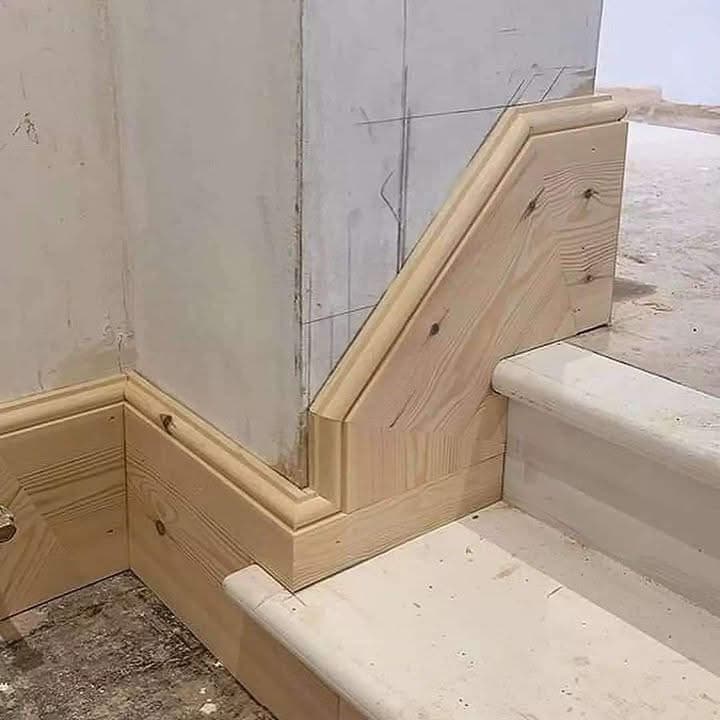
Stair skirt and baseboard mitred into the stringer — the kind of joint you only notice when it is wrong.
Shower backer board
1/2 in. cement board or a foam-core waterproof panel over studs at 16 in. o.c., joints reinforced with alkali-resistant mesh tape and thinset, fasteners set flush
Shower waterproofing
Bonded sheet or liquid-applied membrane meeting ANSI A118.10, with preformed corners, sealed pipe and valve penetrations, and the membrane lapped over the curb
Shower pan and drain
1/4 in. per foot fall to the drain, pre-sloped mud bed or a pre-pitched foam tray, 1/4 in. per foot fall to the drain, pre-sloped mud bed or a pre-pitched foam tray, with either a bonding-flange drain for a bonded membrane or a clamping-ring drain over a mud bed with its weep holes protected by pea gravel
Floor substrate over slab
Uncoupling or crack-isolation membrane under floor tile, with self-leveling underlayment where the slab is out of plane more than 1/4 in. in 10 ft.
Setting mortar and coverage
Modified thinset or medium-bed mortar per the tile size, tile back-buttered and beaten in, 95 percent mortar coverage in wet areas and 80 percent minimum elsewhere
Grout and sealant
Unsanded grout at joints 1/8 in. and under, sanded above; high-performance cement or epoxy grout on shower floors; 100 percent silicone at every change of plane
Drywall
1/2 in. moisture-resistant board outside the wet area, 1/2 in. sag-resistant board on ceilings framed 24 in. o.c., 1/2 in. moisture-resistant board outside the wet area, 1/2 in. sag-resistant board on ceilings framed 24 in. o.c., and gypsum board carried continuously across any wall or ceiling shared with an attached garage, thickness per the separation the house requires
Exhaust ventilation
Fan sized at roughly 1 CFM per square foot for baths up to 100 sq ft, ducted in insulated 4 in. or 6 in. duct to an exterior wall or roof cap, never terminated in the attic
Local conditions
What changes because this is Houston
Gulf Coast clay, humidity and a storm season are not background detail. They decide how this work gets built.
Clay soils move slabs, and tile shows it first
Greater Houston sits on the Gulf Coastal Plain over expansive clay that swells in the wet months and shrinks in a dry August. That seasonal movement is why doors start to stick, why corner cracks open in drywall, and why a floor tile can crack in a straight line across a room. An uncoupling or crack-isolation membrane under bathroom floor tile is inexpensive relative to the tile it protects, and if the house already shows sticking doors and separating trim, it is worth understanding the foundation's condition before you spend money on a hard, brittle finish.
Post-tension slabs limit where a drain can go
A large share of Houston-area homes are built on post-tension slabs, with steel cables stressed inside the concrete. You cannot saw cut or core that slab to relocate a toilet or shower drain without locating the cables first, which means scanning the area and marking it before any blade touches concrete. Sometimes the right answer is to scan and cut carefully; often it is cheaper and safer to redesign the layout around the drain that already exists, using an offset flange or repositioning the fixture a few inches instead.
Humidity is what kills a bathroom finish here
In a humid subtropical climate with long, wet summers, a bathroom that cannot dry out between showers will grow mildew at the ceiling, on the grout and behind the vanity toe kick no matter how good the tile work is. The fan has to be sized for the room and ducted to an exterior cap, because a fan blowing into the attic just moves the moisture into your insulation and roof deck. A humidity-sensing or timer switch that keeps the fan running after the shower stops does more for the life of the finish than any upgrade you can buy at the tile counter.
Permits and deed restrictions depend on exactly where the house sits
Houston has no conventional zoning ordinance, so what governs your project is usually a set of deed restrictions or HOA covenants rather than a zoning map. Finish-only work is treated differently from work that relocates plumbing or adds circuits, and the office that issues the permit depends on your address: inside city limits it is the Houston Permitting Center, in unincorporated Harris County it runs through the county, and Fort Bend, Montgomery, Brazoria, Galveston, Waller and the incorporated suburbs each run their own. Many suburban homes in Harris and Fort Bend also sit inside a MUD, which is the entity that supplies water and sewer service, so it is worth checking whether the district has requirements of its own before any work reaches the service lines. We confirm which jurisdiction applies before demolition rather than after.
Older homes bring older plumbing and hidden rot
Inside the Loop and in the older neighborhoods, pier-and-beam floors and cast iron drain lines are common, and opening a bathroom floor can reveal scaled, cracked or belly-sagged cast iron along with galvanized supply lines that have narrowed to a pencil. Add years of slow leaking behind a failed shower and Gulf Coast humidity, and the sole plate and subfloor become an easy target for rot and for termites, including Formosan termites. We would rather price that repair honestly at demolition than bury it behind new tile.
How it runs
From the first call to the last walkthrough
1
Walkthrough and free estimate
We come out, measure the room, and look at the things that drive the number: the existing valve and its rough-in, where the drains sit, the flatness of the walls and floor, the vent fan and where it terminates, the condition of the ceiling below, and whether the slab or the framing is telling us something. Estimates are free. We also ask what you want out of the room, because a bathroom that has to serve two adults every weekday morning gets planned differently from a guest bath.
2
Scope, selections and a written estimate
You get a written scope that says what is included and what is not, so there is no argument later about who is supplying the vanity or the shower glass. Tile, vanity, top, fixtures and glass all have different lead times, and selections made early are the single biggest thing a homeowner controls in the schedule. Anything unknown behind the walls is called out as a possible condition up front rather than sprung on you mid-job.
3
Permits, protection and staging
We confirm which office has jurisdiction over the address and make sure the permits the work requires are in hand before demolition, with the plumbing and electrical permits pulled by the trades performing that portion of the work. Floors along the path from the door to the bathroom get protected, the doorway gets sealed for dust control, and we agree on which bathroom the household will use and how long it will be out of service.
4
Demolition and rough-in
The room comes apart, the framing gets inspected, and any rot, termite damage or failing drain line is documented and priced before it is covered. Framing changes, blocking and niche work happen next, then rough plumbing and electrical, with inspections scheduled where the permit requires them. Nothing gets closed up until the rough work has been signed off.
5
Waterproofing, flood test and tile
Backer board goes on, then the waterproofing system with its corners and penetrations sealed, and the pan gets flood tested and left to sit before anything is set. Then layout lines, floor and wall tile, niche and curb, edge profiles, and grout once the mortar has cured. Silicone, not grout, goes at the inside corners and at the floor-to-wall joint.
6
Finishes, punch list and walkthrough
Vanity, top, mirror, lighting, fixtures, glass, then drywall touch-up, trim and paint. We run the shower and the fan, check every drain and stop for drips, cycle the doors and drawers, and then walk the room with you and write down anything that is not right. The punch list gets finished before we consider the job done.
Stair skirt and baseboard mitred into the stringer — the kind of joint you only notice when it is wrong.
Questions
Bathroom Remodeling, answered
How long does a bathroom remodel take?
A hall bath being refinished without moving plumbing generally runs a couple of weeks of active work; a primary bath taken to the studs with a relocated fixture, custom tile and frameless glass runs considerably longer. The schedule is driven less by labor than by three things: how early your selections are locked, inspection scheduling if the work is permitted, and shower glass, which cannot be measured until the tile is finished and then has to be fabricated. We give you a working sequence at the start and tell you when the room will be unusable.
Do I need a permit for a bathroom remodel in Houston?
It depends on the work and on the address. Replacing tile, a vanity, a toilet in the same location or a light fixture is normally treated as finish work, while relocating drains, adding circuits or altering framing generally requires a permit and inspections. Inside the city limits that goes through the Houston Permitting Center, in unincorporated Harris County through the county, and the surrounding counties and incorporated suburbs each run their own offices. On top of that, your deed restrictions or HOA may have their own requirements, since Houston relies on those rather than conventional zoning.
Can the toilet or the shower drain be moved if my house is on a slab?
Usually yes, but it means cutting concrete, and on a post-tension slab the cables have to be located and marked before any cutting starts. That adds scanning, careful saw work, re-plumbing below the slab and a proper concrete patch, so it is real money rather than a small change order. Before committing, it is worth seeing whether an offset flange or a few inches of fixture movement gets you most of the layout you wanted without opening the floor at all.
What actually drives the cost of a bathroom remodel?
The biggest levers are whether plumbing moves, how large the wet area is, and how much of the wall gets tiled, because tile is labor before it is material. After that come tile format and pattern, since large-format and herringbone both take longer to set than a straight lay, along with frameless glass, the vanity and countertop, and anything discovered behind the walls once demolition starts. We price from what is actually in the room rather than a per-square-foot average, and unknowns are called out as unknowns up front.
Should I keep the tub or convert to a walk-in shower?
If the house has only one tub, it is usually worth keeping a tub somewhere in the house, both for resale and for families with small children. A tub-to-shower conversion in the same footprint is straightforward; a curbless entry is not, because the pan has to be recessed into the floor, which on a slab means cutting concrete and on a pier-and-beam house means dropping or sistering the framing. If you want a low-threshold shower without that work, a low curb with a well-designed slope gets you most of the way.
How do I know the shower was really waterproofed?
Ask which waterproofing system is being used and whether it is a bonded sheet or liquid-applied membrane, then ask to see photographs of the corners, the curb and the drain flange before tile covers them. Ask for the flood test described above, and ask to see the result yourself rather than being told it passed. A remodeler who waterproofs properly will have no problem showing you either one, because that stage is the part of the job worth photographing.
Call and talk to someone who has been doing this for 15+ years. We will look at the space, tell you what the work actually involves, and put a number on it — at no cost.