Tile, luxury vinyl plank and engineered wood floors installed over properly prepped, moisture-tested Houston slabs.
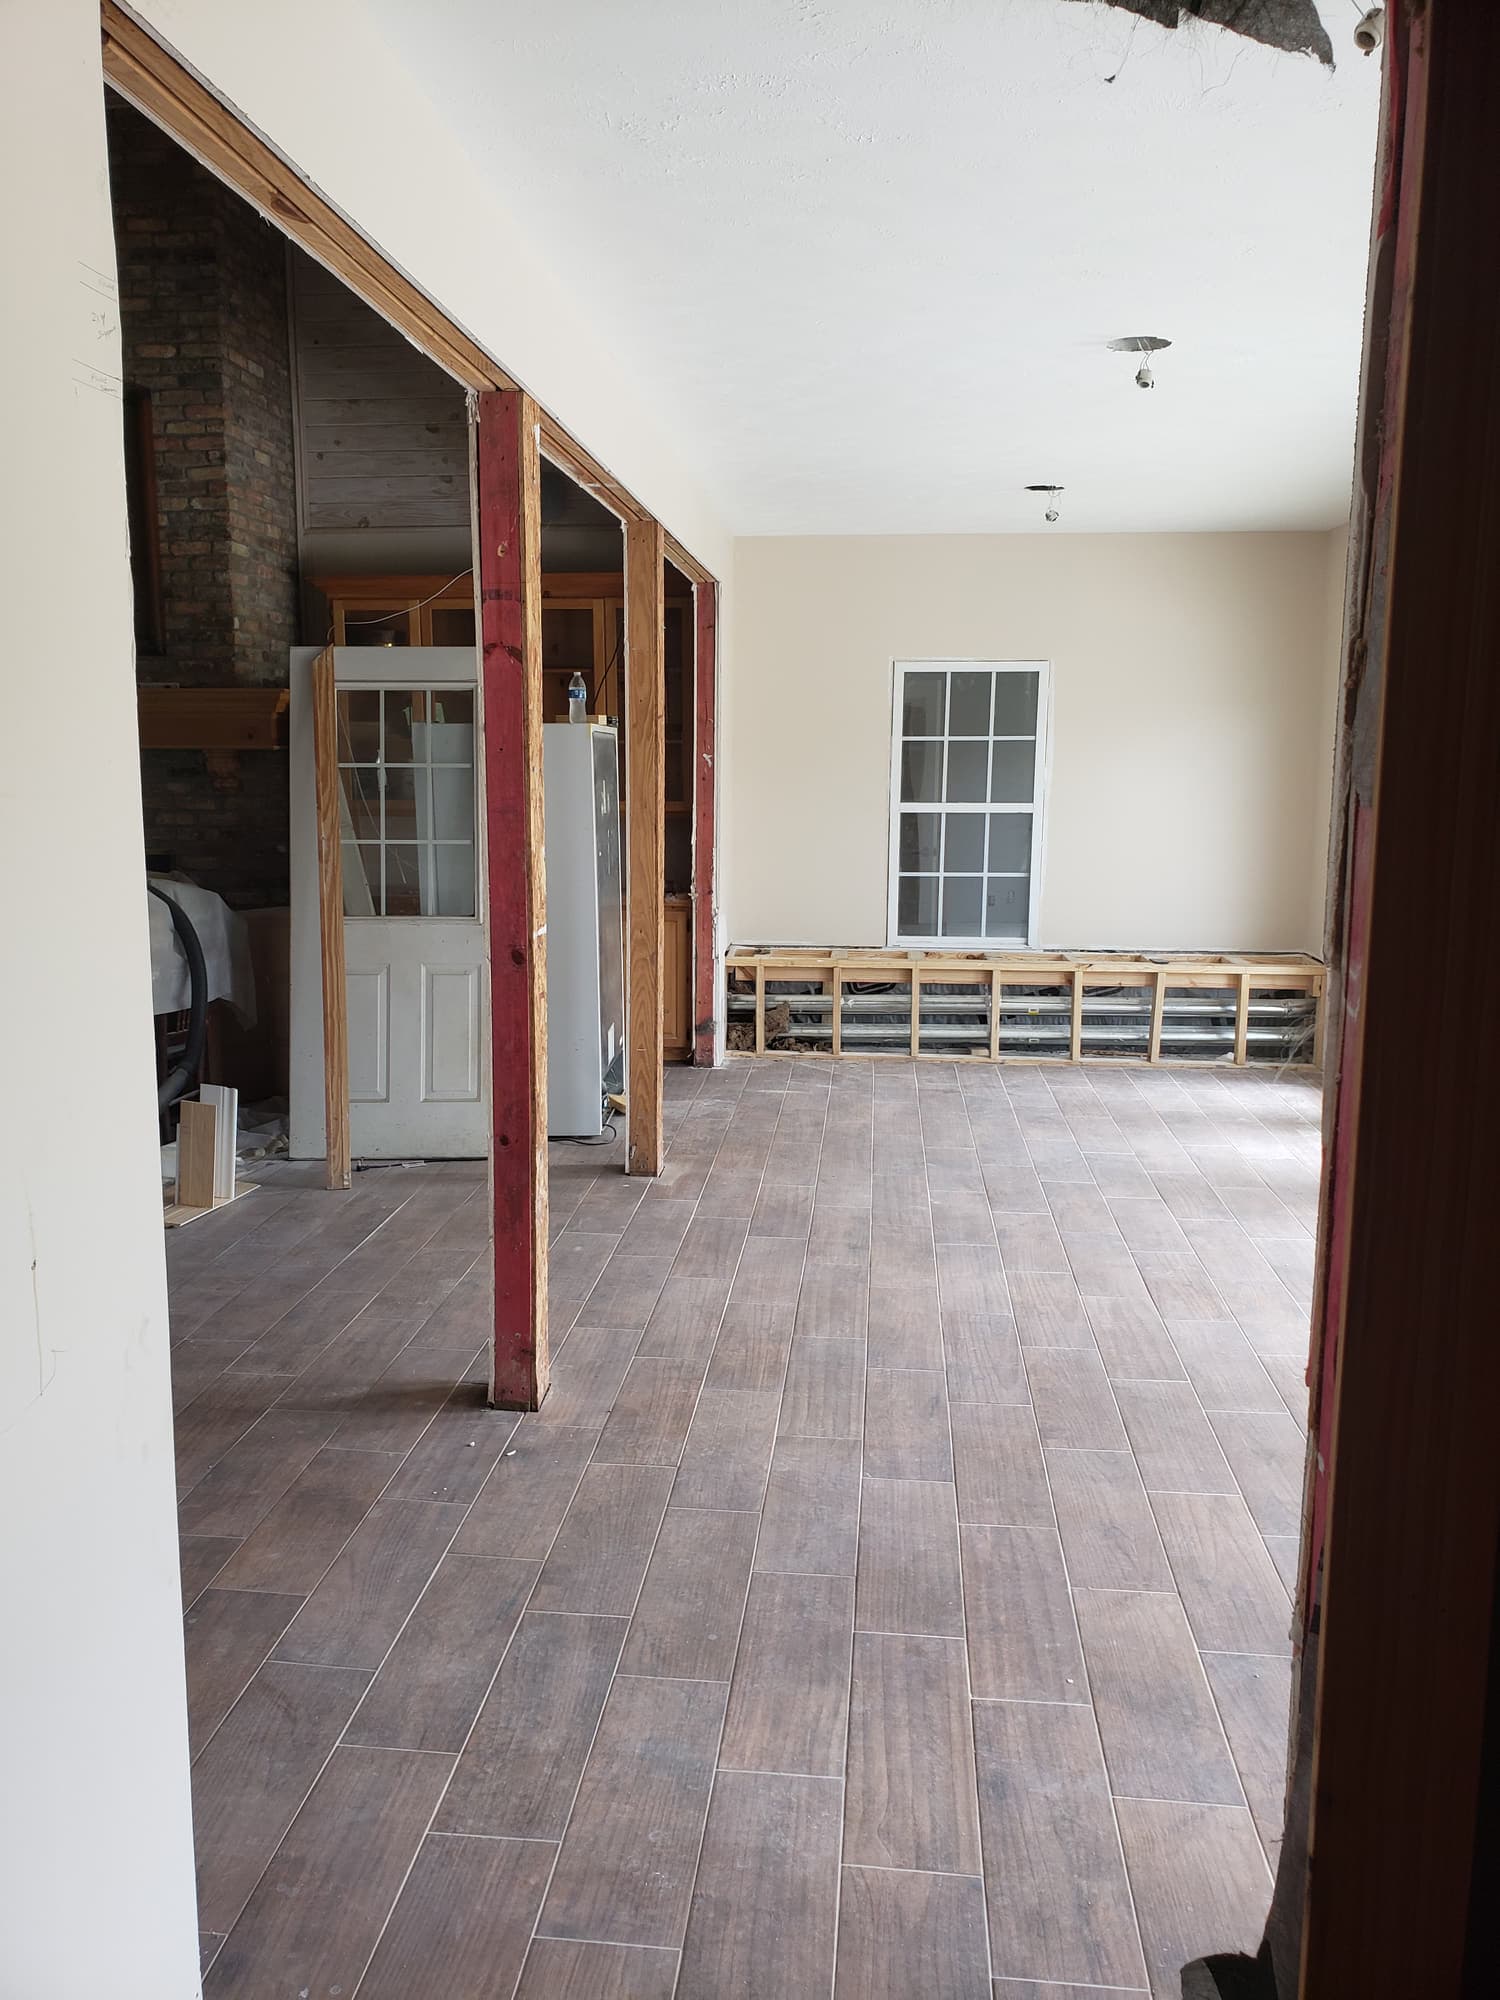
New header framed across the widened opening; wood-look porcelain already down.
In our own words
Professional Flooring Installation
Give your home a fresh new look with beautiful, professionally installed flooring.
We install:
Luxury Vinyl
Everything below is the detail behind that: how the work is sequenced, what it is built from, and what changes in a Houston house.
When a floor fails early, the problem is almost always under it rather than in it. A tile that cracked along a line in the slab, a plank floor that separates at the end joints because the slab was out of flat by half an inch across the room, vinyl that lifted at the seams because moisture was still coming up through the concrete. The material was fine. What was under it was not.
Wood-look porcelain run through a widened opening. When a wall comes out, the floor layout has to be set for the new room, not the two old ones, so the tile lines up with the sight line you actually walk in on.
We install porcelain and ceramic tile, luxury vinyl plank, and engineered wood in occupied houses across Houston and the surrounding areas. Before any of it is ordered, three things get answered: what the substrate is and what condition it is in, how flat it is measured against a ten-foot straightedge, and how much moisture the slab is giving off. Those answers decide which products are on the table and how much prep the job really needs.
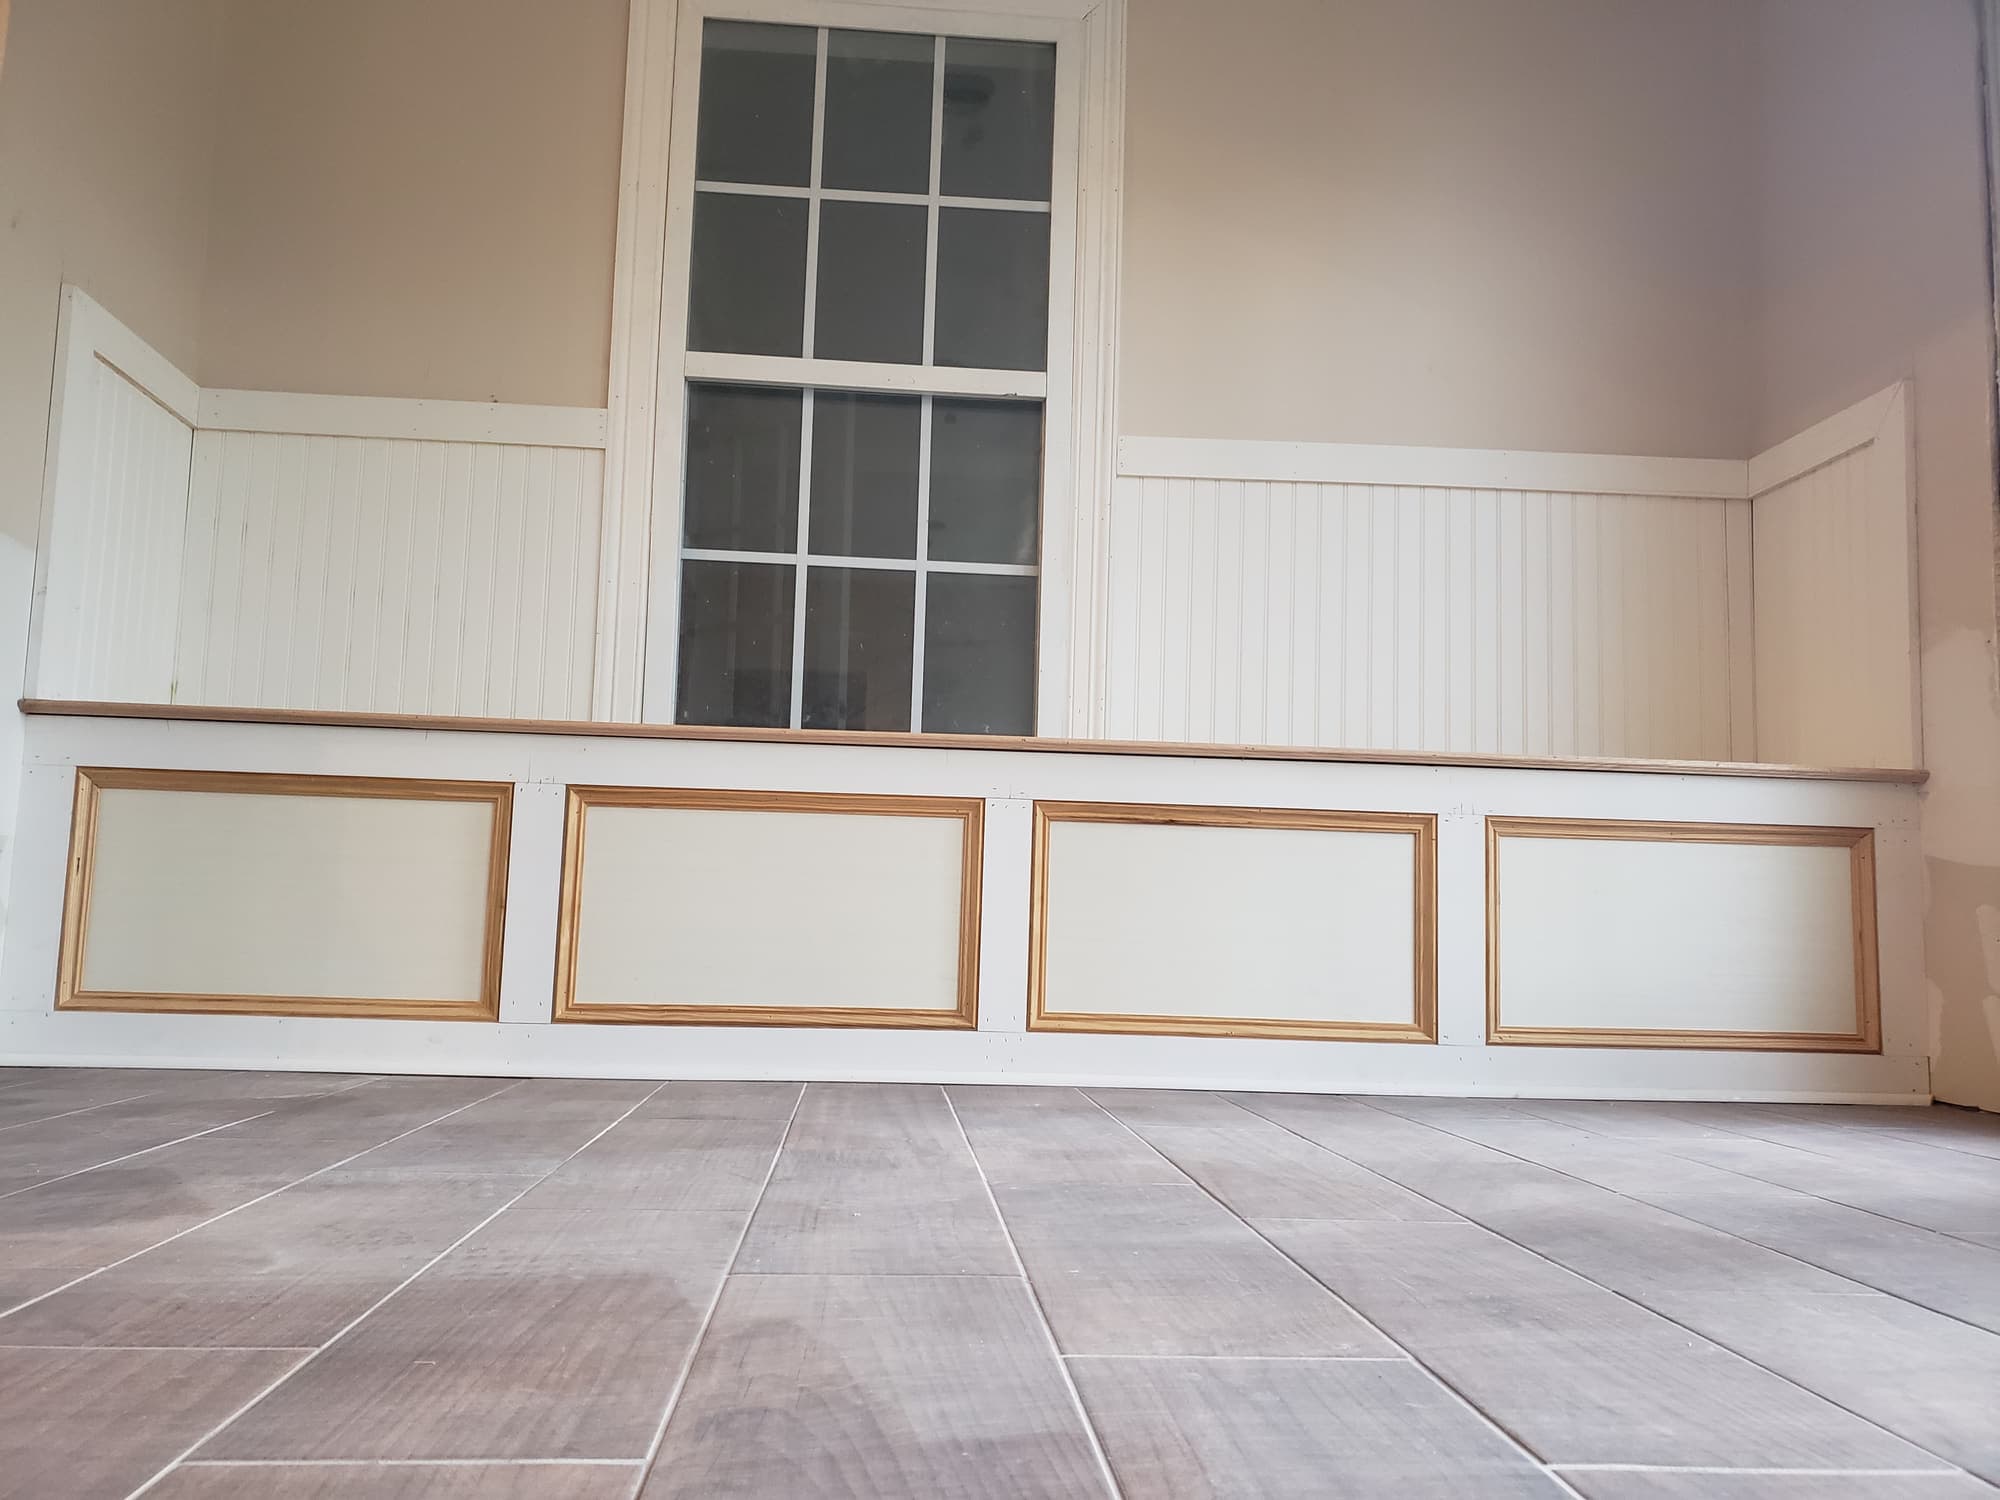
Wood-look tile finished into panel base and beadboard wainscot. The joint where the floor meets the trim is where a floating floor gets its room to move, so the base and shoe are part of the flooring job, not an afterthought.
What the job includes
Scope, in the order it happens
01
Substrate assessment and moisture testing
We identify what the floor is going over, slab or wood subfloor, and check flatness with a ten-foot straightedge instead of eyeballing it. Slabs that will receive adhesive get moisture tested, and existing cracks are mapped so the assembly can be designed around them. If a wood subfloor is spongy between joists or has been wet, that gets addressed before anything decorative goes on top.
02
Tear-out and disposal
Carpet, pad, tack strip, old vinyl, laminate and bonded tile come out, and thinset residue is ground back so the new floor sits on a clean plane. Dust control and floor protection are set up before demolition starts, and debris is hauled off the property. Older materials that may contain asbestos are tested before being disturbed rather than dry-scraped.
03
Floor prep and leveling
High spots get ground, low spots get patched, and rooms that are out of tolerance get a primed, poured self-leveling underlayment. On wood subfloors we screw down squeaks and set 1/2 in. cement board in thinset before tile. Slabs receiving tile get an uncoupling or crack-isolation membrane so the tile is not locked to a moving slab.
04
Tile installation
Layout is chalked from the room's controlling sight line, not from the nearest wall, so cuts fall where they show least. Large-format tile is set in medium-bed mortar with back-buttering and leveling clips to hold lippage down, and we pull a set tile periodically to verify mortar coverage. Movement joints go in at the perimeter and where the tile meets a different material, and grout is matched sanded or unsanded to the joint width.
05
Luxury vinyl plank and engineered wood
Material acclimates inside the conditioned house before installation. Floating floors are installed with end joints staggered, a full expansion gap at every wall, jamb and vertical obstruction, and the underlayment or attached pad the manufacturer requires. Glue-down and nail-down engineered wood is used where the substrate and moisture readings support it, not by default.
06
Trim, transitions and thresholds
Base and shoe are pulled and reinstalled, or replaced with new profiles, and transitions are chosen for the actual height difference rather than whatever strip came in the box. Tile edges and exposed ends get metal or Schluter-style profiles instead of bullnose that no longer matches. Thresholds are set in the doorway under the closed door so you do not see a strip from the room you are standing in.
07
Cleanup, reset and protection
Grout haze is removed, floors are cleaned, and appliances and toilets are reset with new supply connections and wax rings where they were pulled. If other trades are still working in the house, the finished floor gets covered with protection board or paper. Leftover material is stacked and labeled so you have matching tile or plank on hand for a future repair.
Materials and specification
What it is actually built from
Specifications vary with the house and what we find once it is open. This is the standard we work to unless there is a reason not to — and if there is, we will tell you what it is before we change it.
Beadboard wainscoting, chair rail and recessed panel base over wood-look tile.
Substrate flatness
1/4 in. in 10 ft. for tile with all edges under 15 in.; 1/8 in. in 10 ft. for large-format tile 15 in. and over; 3/16 in. in 10 ft. is the typical limit for click-lock vinyl plank
Slab moisture testing
In-situ relative humidity probes read per ASTM F2170, or calcium chloride testing, before any glue-down wood or adhered vinyl; most manufacturers cap acceptance around 75 to 85 percent RH
Backer board over wood subfloor
1/2 in. cement board bedded in thinset and screwed roughly 8 in. o.c., seams taped with alkali-resistant mesh, over minimum 3/4 in. plywood on joists at 16 in. o.c.
Movement protection over slab
Sheet or trowel-applied uncoupling or crack-isolation membrane meeting ANSI A118.12, with perimeter and change-of-plane joints left open for sealant
Mortar and coverage
ANSI A118.4 modified thin-set for most porcelain, medium-bed mortar under large-format tile; 80 percent mortar contact in dry areas and 95 percent in showers and other wet areas, verified by pulling a set tile
Grout and sealant
Sanded grout at joints 1/8 in. and wider, unsanded below 1/8 in.; 100 percent silicone at inside corners, floor-to-wall joints and tub perimeters instead of grout
Luxury vinyl plank
5 to 8 mm rigid core, SPC or WPC, with a 12 to 20 mil wear layer for residential traffic; floated click-lock with a 1/4 in. expansion gap at every wall, jamb and post
Engineered wood
3/8 to 3/4 in. thick with a 2 mm or thicker sawn wear layer if it may ever be refinished; floated, glued or nailed based on substrate and moisture readings, acclimated in the conditioned house first
Local conditions
What changes because this is Houston
Gulf Coast clay, humidity and a storm season are not background detail. They decide how this work gets built.
Expansive clay keeps the slab moving under the floor
Greater Houston sits on shrink-swell clay. The soil takes on water in a wet spring, gives it up in an August drought, and the slab flexes with it, which is why so many local floors crack in one long line instead of one random tile. Rigid tile bonded straight to that slab has nowhere to go. An uncoupling or crack-isolation membrane lets the tile move independently of small slab cracks, and a floating vinyl plank floor sidesteps the problem entirely because it is not bonded to anything. If the crack in your slab is wide, offset in height, or still opening, that is a foundation question to answer before new flooring is ordered.
Slab moisture, not spills, is what kills adhered floors here
Many older Houston slabs were poured without a vapor retarder underneath, and the ground beneath them rarely dries out for long. Moisture vapor rising through the concrete is what breaks down wood adhesive, lifts glue-down vinyl at the seams, and cups engineered planks months after installation. Relative humidity probes set into the slab give a real number instead of a guess, and the number has to fall inside the flooring manufacturer's limit before adhesive goes down. When a slab reads too high, a floating floor with an attached moisture barrier, or a moisture-mitigation coating under the adhesive, is the honest path forward.
Post-tension slabs cannot be drilled or cut blindly
Many Houston-area homes sit on post-tension slabs, with steel cables held under tension inside the concrete. Nothing on a flooring job should be anchored, cored, or saw-cut into that slab without locating the cables first. Grinding high spots and filling low spots with a self-leveling underlayment handles almost all flatness problems without touching a fastener. If a job genuinely needs the slab opened, for a relocated shower drain during a bathroom remodel for example, the cables get located before any blade goes in.
Humidity, acclimation and the rooms that swing the most
In a humid subtropical climate the wood you install in July is at a different moisture content than the same wood in January, and solid hardwood in a wide room will show that seasonally at the seams. Engineered wood, with its cross-laminated core, holds dimension better here, and wood and vinyl plank should sit in the conditioned house before installation, not stacked in a hot garage. Converted patios, sunrooms and rooms with a west-facing wall of glass see the biggest temperature swings, so those rooms are where the expansion gap earns its keep and where a pinched perimeter shows up first. A floor with no room to move buckles in the middle of the summer.
Storm season and floors that have already been wet
From June through November, water gets into Houston houses. Porcelain tile survives standing water, and rigid-core vinyl plank will generally come through it if the water is pulled quickly and what is underneath dries, but the pad, the base and any wood subfloor are the parts that hold moisture and grow mold. If a floor has been wet, it should be checked with a moisture meter before anything new goes over it rather than sealing the problem in. We answer calls outside our Monday through Friday hours for exactly this reason, because water damage does not wait until the next business day.
How it runs
From the first call to the last walkthrough
1
Walkthrough and measure
We measure room by room, look at what is down now and how it is failing, check door clearances and thresholds, and pull a corner or a vent to see what is under the existing floor. We ask about traffic, pets, kids and how long you plan to stay in the house, because those change the product recommendation more than the showroom sample does. More than 15 years of remodeling Houston-area homes means we have usually seen the same failure in the same era of house before.
2
Testing, estimate and material selection
Where an adhered floor is on the table, we test slab moisture before quoting the assembly. The estimate is free and broken down by room and by scope, so prep, material, installation and trim are separate lines rather than one number. If the slab needs grinding or self-leveler, it is written in from the start instead of appearing as a change order on demolition day.
3
Protection, tear-out and haul-off
Floors outside the work area get protected, doorways get sealed, and we run dust control on any grinding or thinset removal. Old flooring, pad, tack strip and debris are hauled off rather than piled in your driveway. Anything suspect in a pre-1980s house, such as old vinyl tile or black cutback adhesive, is tested before it is disturbed, not scraped up and dealt with later.
4
Substrate prep
Prep is the step that gets checked with a ten-foot straightedge rather than by eye, and it happens before any material is opened. Grinding, patching and, in rooms that are out of tolerance, a primed self-leveling pour bring the floor into the range the chosen product needs. Wood subfloors get refastened to the joists where they squeak and sheathed in cement board set in thinset; slab areas taking tile get their membrane laid with the perimeter held open for sealant. We recheck flatness after the prep has cured, before the first tile or plank goes down.
5
Layout and installation
We chalk center lines and dry-lay before setting anything, so cut pieces land where they are least visible and no doorway ends up with a sliver. Tile gets back-buttered and checked for mortar coverage as we go; plank floors get end joints staggered well apart, run in the direction agreed on, with the expansion gap held at every wall and jamb. Door jambs get undercut so flooring runs beneath them instead of being cut around them.
6
Grout, trim, transitions and walkthrough
Tile is grouted, cleaned of haze, and sealed at inside corners and floor-to-wall joints with silicone rather than grout. Base and shoe go back or new trim goes in, transitions and edge profiles are set at every height change, and toilets are reset on a new wax ring at the correct flange height. We walk the whole floor with you in daylight, at the angle where imperfections actually show, and note anything that needs attention before we load out.
Beadboard wainscoting, chair rail and recessed panel base over wood-look tile.
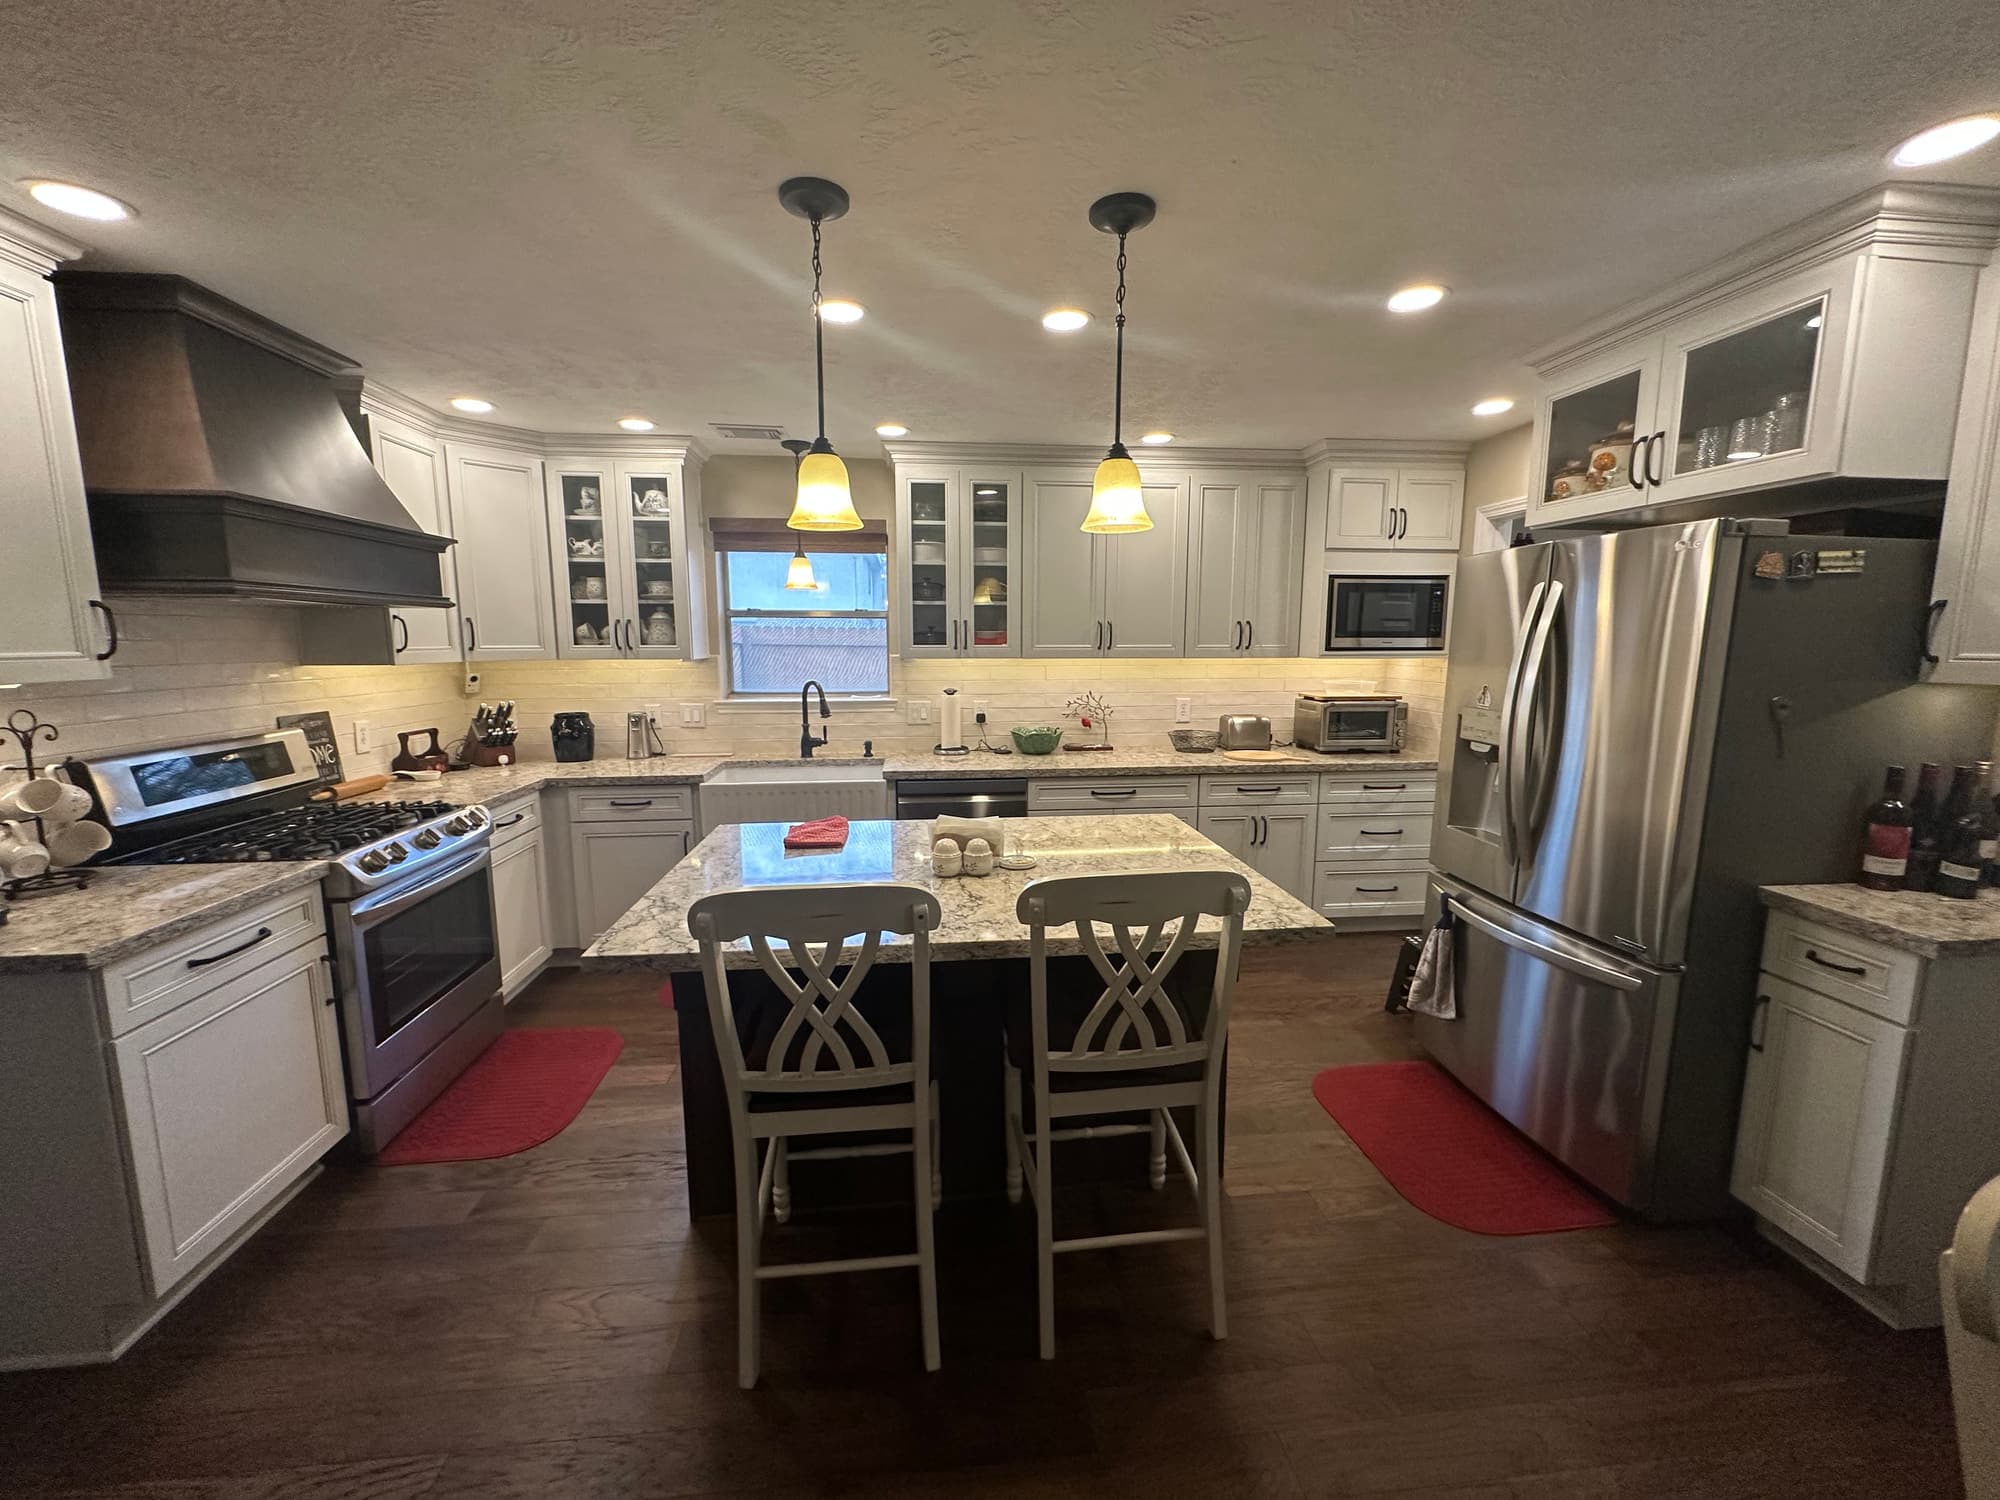
After: a custom wood hood, a seated island and hardwood running through to the dining room.
Questions
Flooring Installation, answered
Can new flooring go over the tile that is already there?
Sometimes, but it is rarely the better answer. Tile can be installed over sound, well-bonded tile, and vinyl plank can float over tile once the grout joints are filled flat, but both raise the finished floor, which affects door swing, appliance height under a countertop, and every threshold in the house. If the existing tile sounds hollow when you tap it, there are voids or a failing bond underneath, and those areas should come out rather than be built over. Removal is dusty and adds labor, but it lets us see and correct the substrate instead of building on top of an unknown.
How do you know whether my slab is dry enough for wood or glue-down vinyl?
We test it rather than assume. Relative humidity probes drilled into the slab and read after they equilibrate give the moisture condition inside the concrete, and calcium chloride testing measures what is coming off the surface. Taping a square of plastic to the floor overnight will show you obvious moisture but tells you nothing about a slab that is marginal. If the readings come back above what the flooring manufacturer allows, the choice is a floating floor, a different product, or a moisture-mitigation system under the adhesive.
My tile cracked in a straight line across two rooms. Will new tile do the same thing?
A straight crack running through multiple tiles almost always follows a crack in the slab underneath, and new tile set the same way will crack in the same place. Installing over an uncoupling or crack-isolation membrane separates the tile from small slab movement and is the standard fix for a hairline shrinkage crack. If the slab crack has vertical offset, is still widening, or comes with sticking doors and separating door casings, have the foundation evaluated first. New flooring cannot hold a moving slab together.
For a Houston house, is tile or luxury vinyl plank the better choice?
Both handle humidity well, so the decision usually comes down to water, comfort and substrate condition. Porcelain tile is the right call for bathrooms, laundry rooms and entries where standing water is likely, and it is the more durable surface under dogs and grit. Rigid-core vinyl plank is warmer and quieter underfoot, installs faster, is more forgiving of a hairline crack in the slab, though a click-lock floor actually wants a flatter substrate than standard-size tile does. A common approach is wood-look porcelain in the wet rooms and vinyl plank through the living areas, matched closely enough that the transition reads as intentional.
Do the baseboards have to come off?
For a floating floor, yes, or at minimum a shoe molding has to be added. Vinyl plank and floating engineered wood need a quarter-inch expansion gap at every wall, and that gap has to be covered by trim, never filled with caulk or grout, or the floor will bind and peak. Pulling and reinstalling existing base works when the trim is in good shape and the profile is worth saving. Many homeowners use the opportunity to replace short base with taller stock, which is trim carpentry work we do at the same time, and it is a good moment to handle interior painting while the room is already empty.
How soon can we walk on it and put the furniture back?
A floating vinyl plank floor can be walked on and loaded the same day it is finished. Tile is slower: light foot traffic after the mortar sets overnight, grout the next day, and heavier furniture and appliances after the grout has had a couple of days, longer in a humid house where curing slows down. Keep the air conditioning running during and after installation, because that is what actually pulls the moisture out. Silicone at the perimeter and change-of-plane joints goes in last and needs its own cure time before the room gets wet.
Call and talk to someone who has been doing this for 15+ years. We will look at the space, tell you what the work actually involves, and put a number on it — at no cost.